Campfire Jambalaya: A Taste of New Orleans

Jambalaya
 New Orleans Chicken & Sausage Jambalaya cooked over campfire

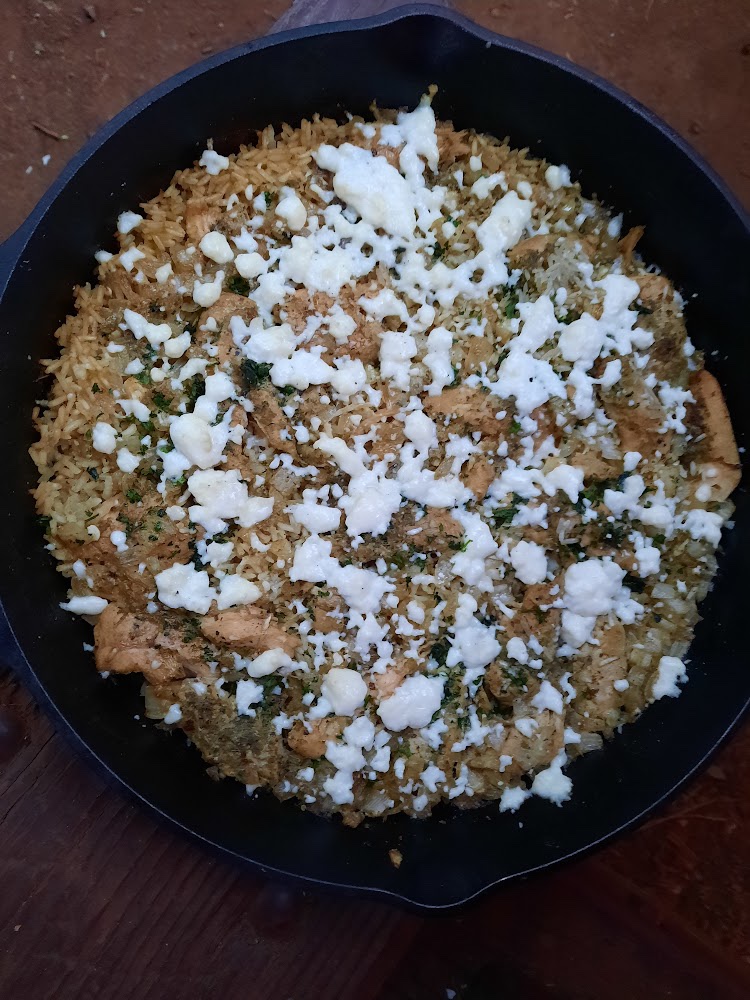
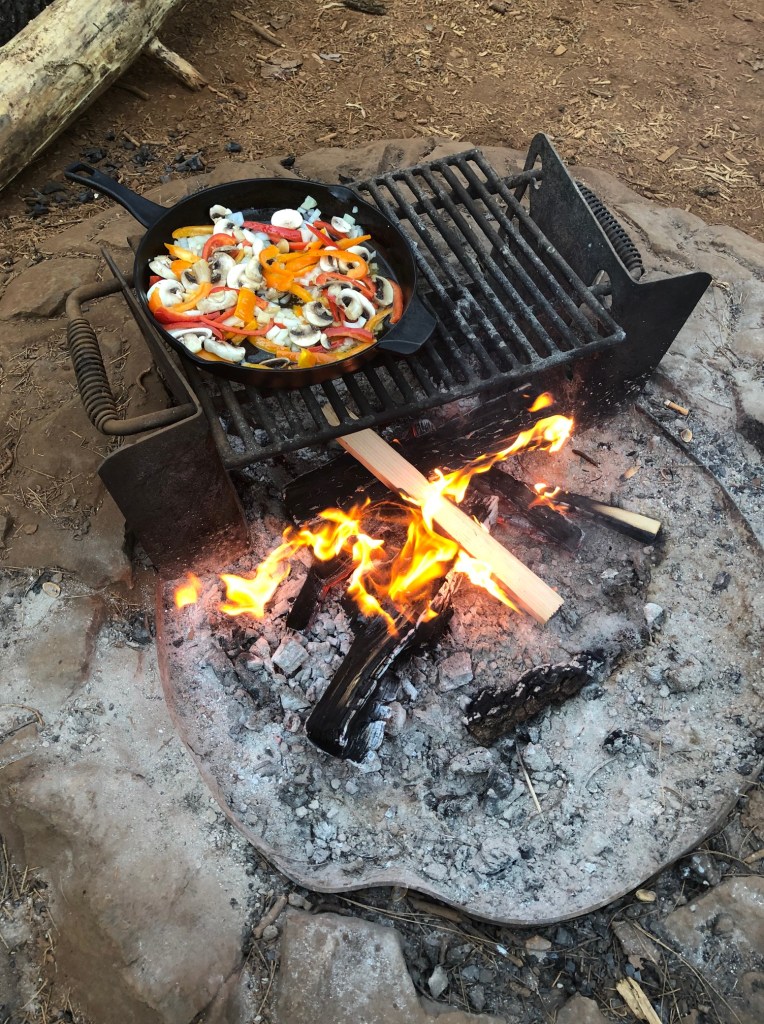
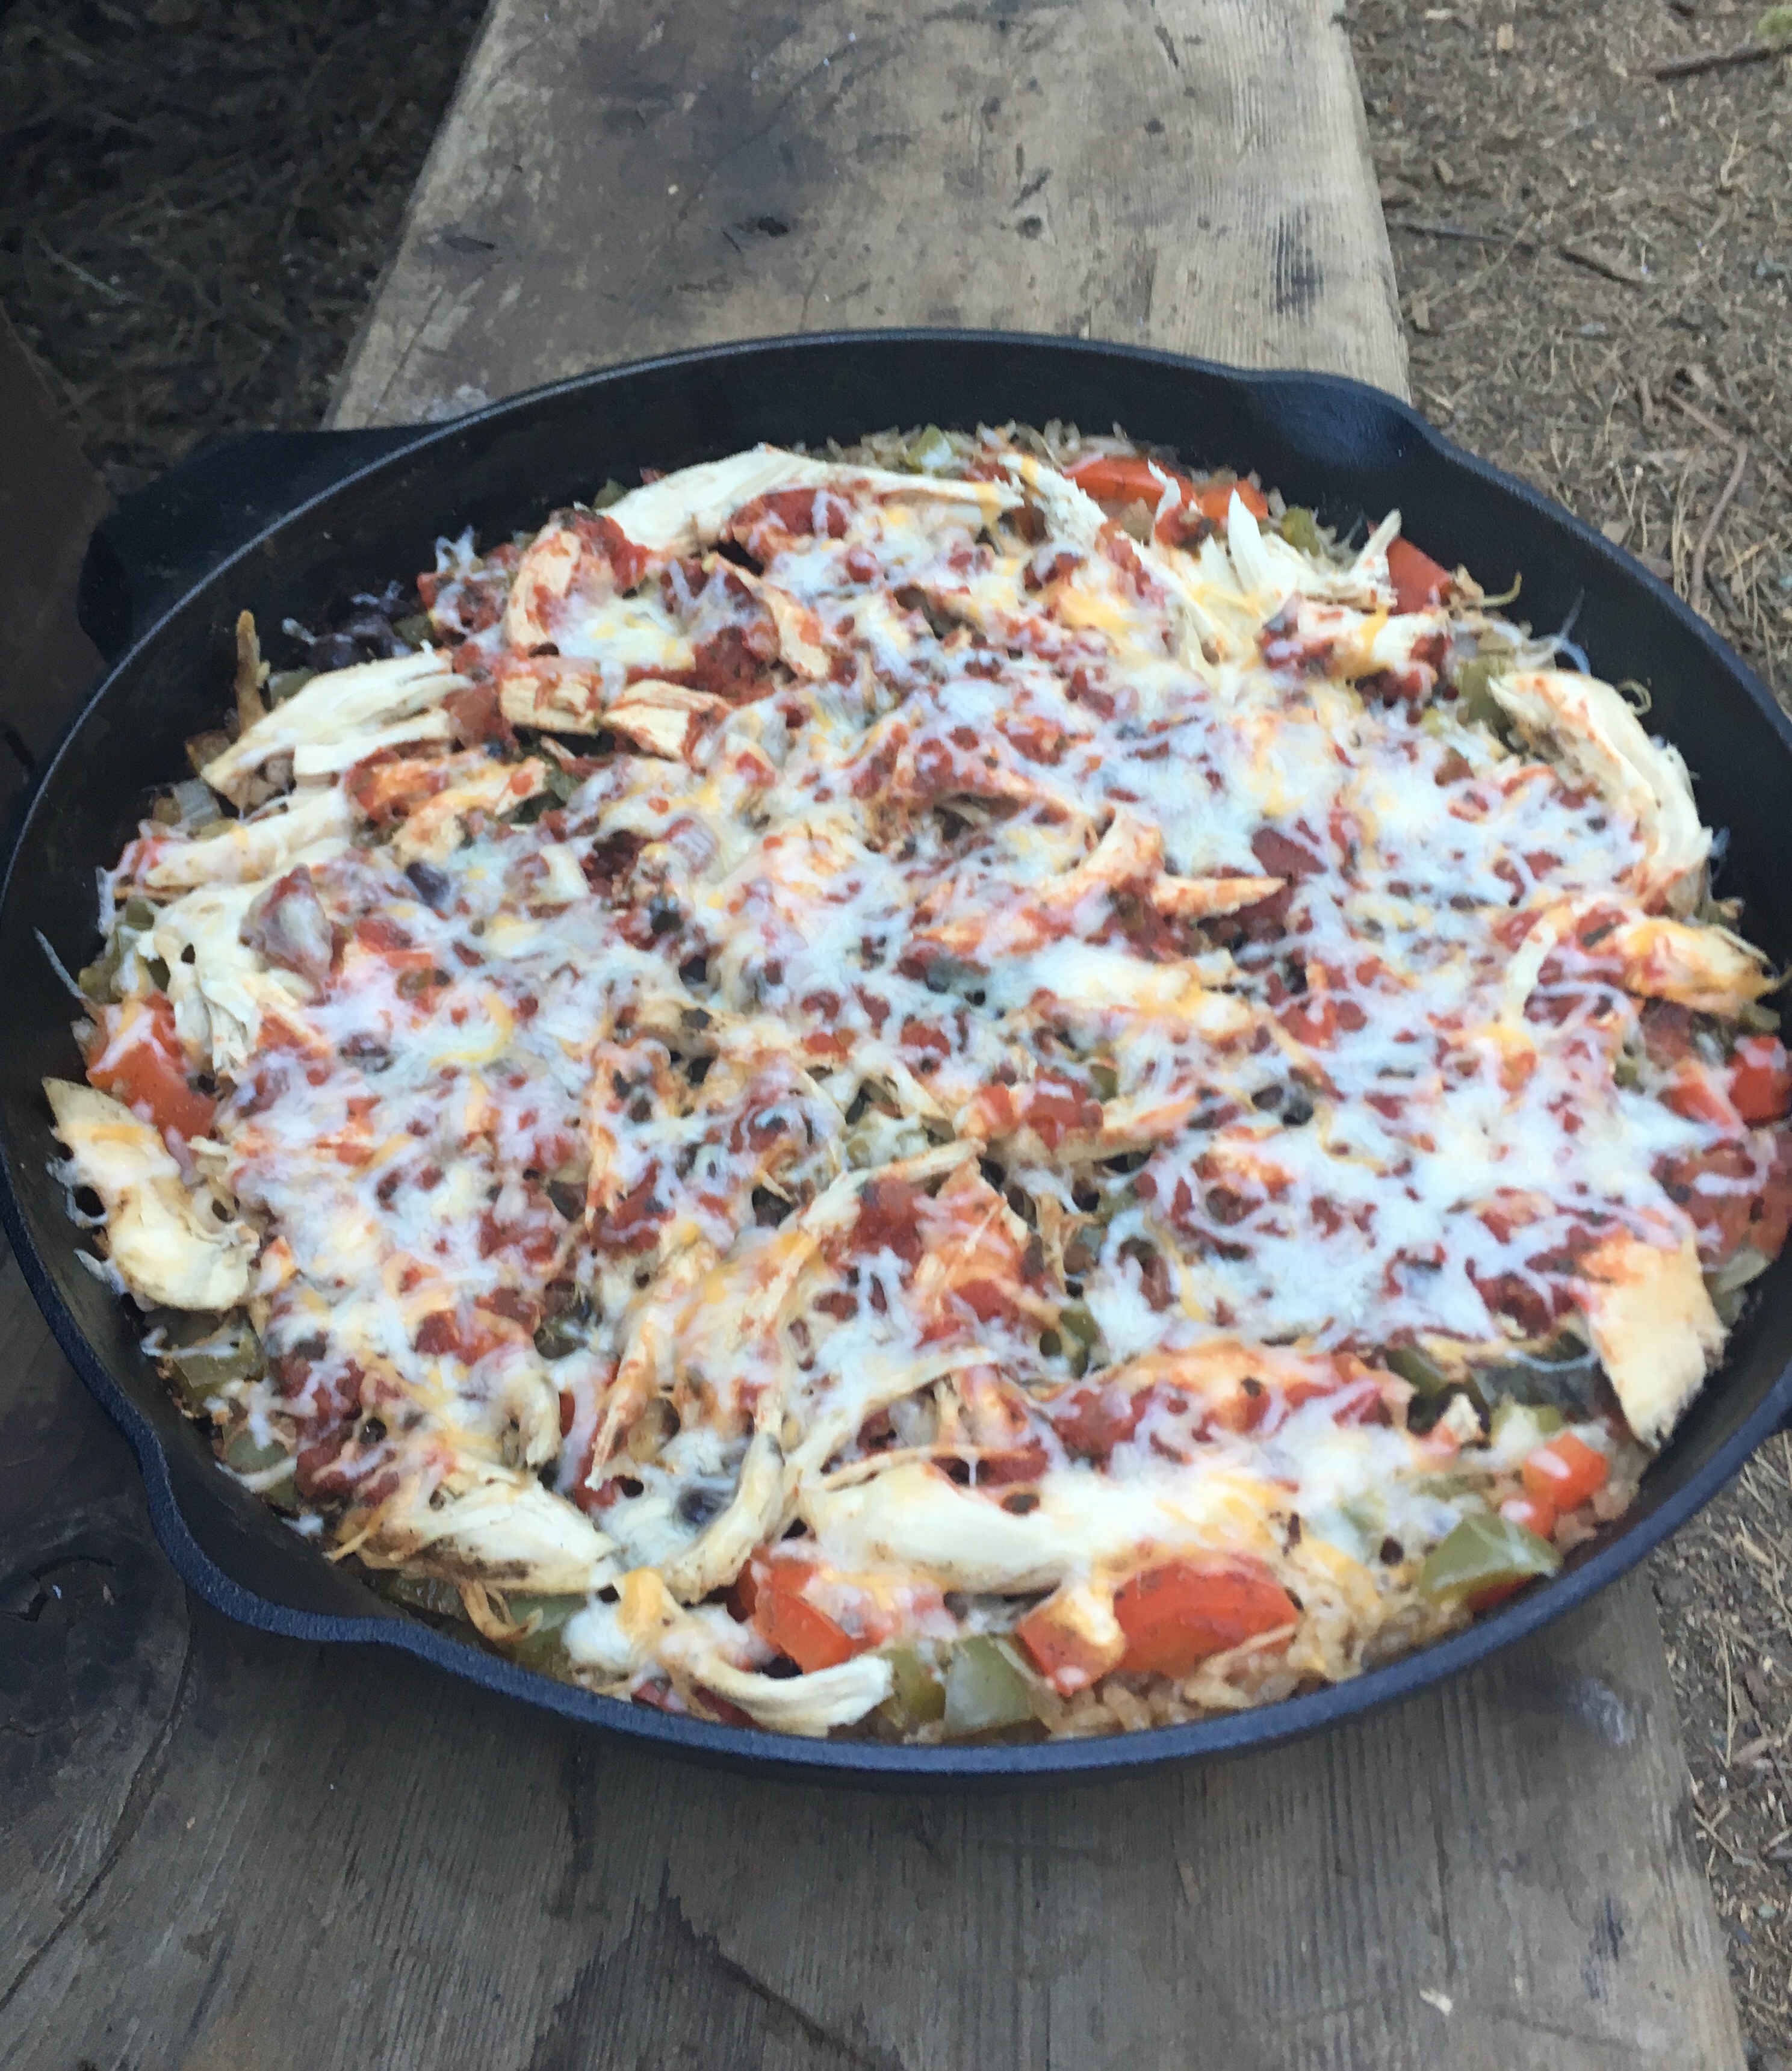
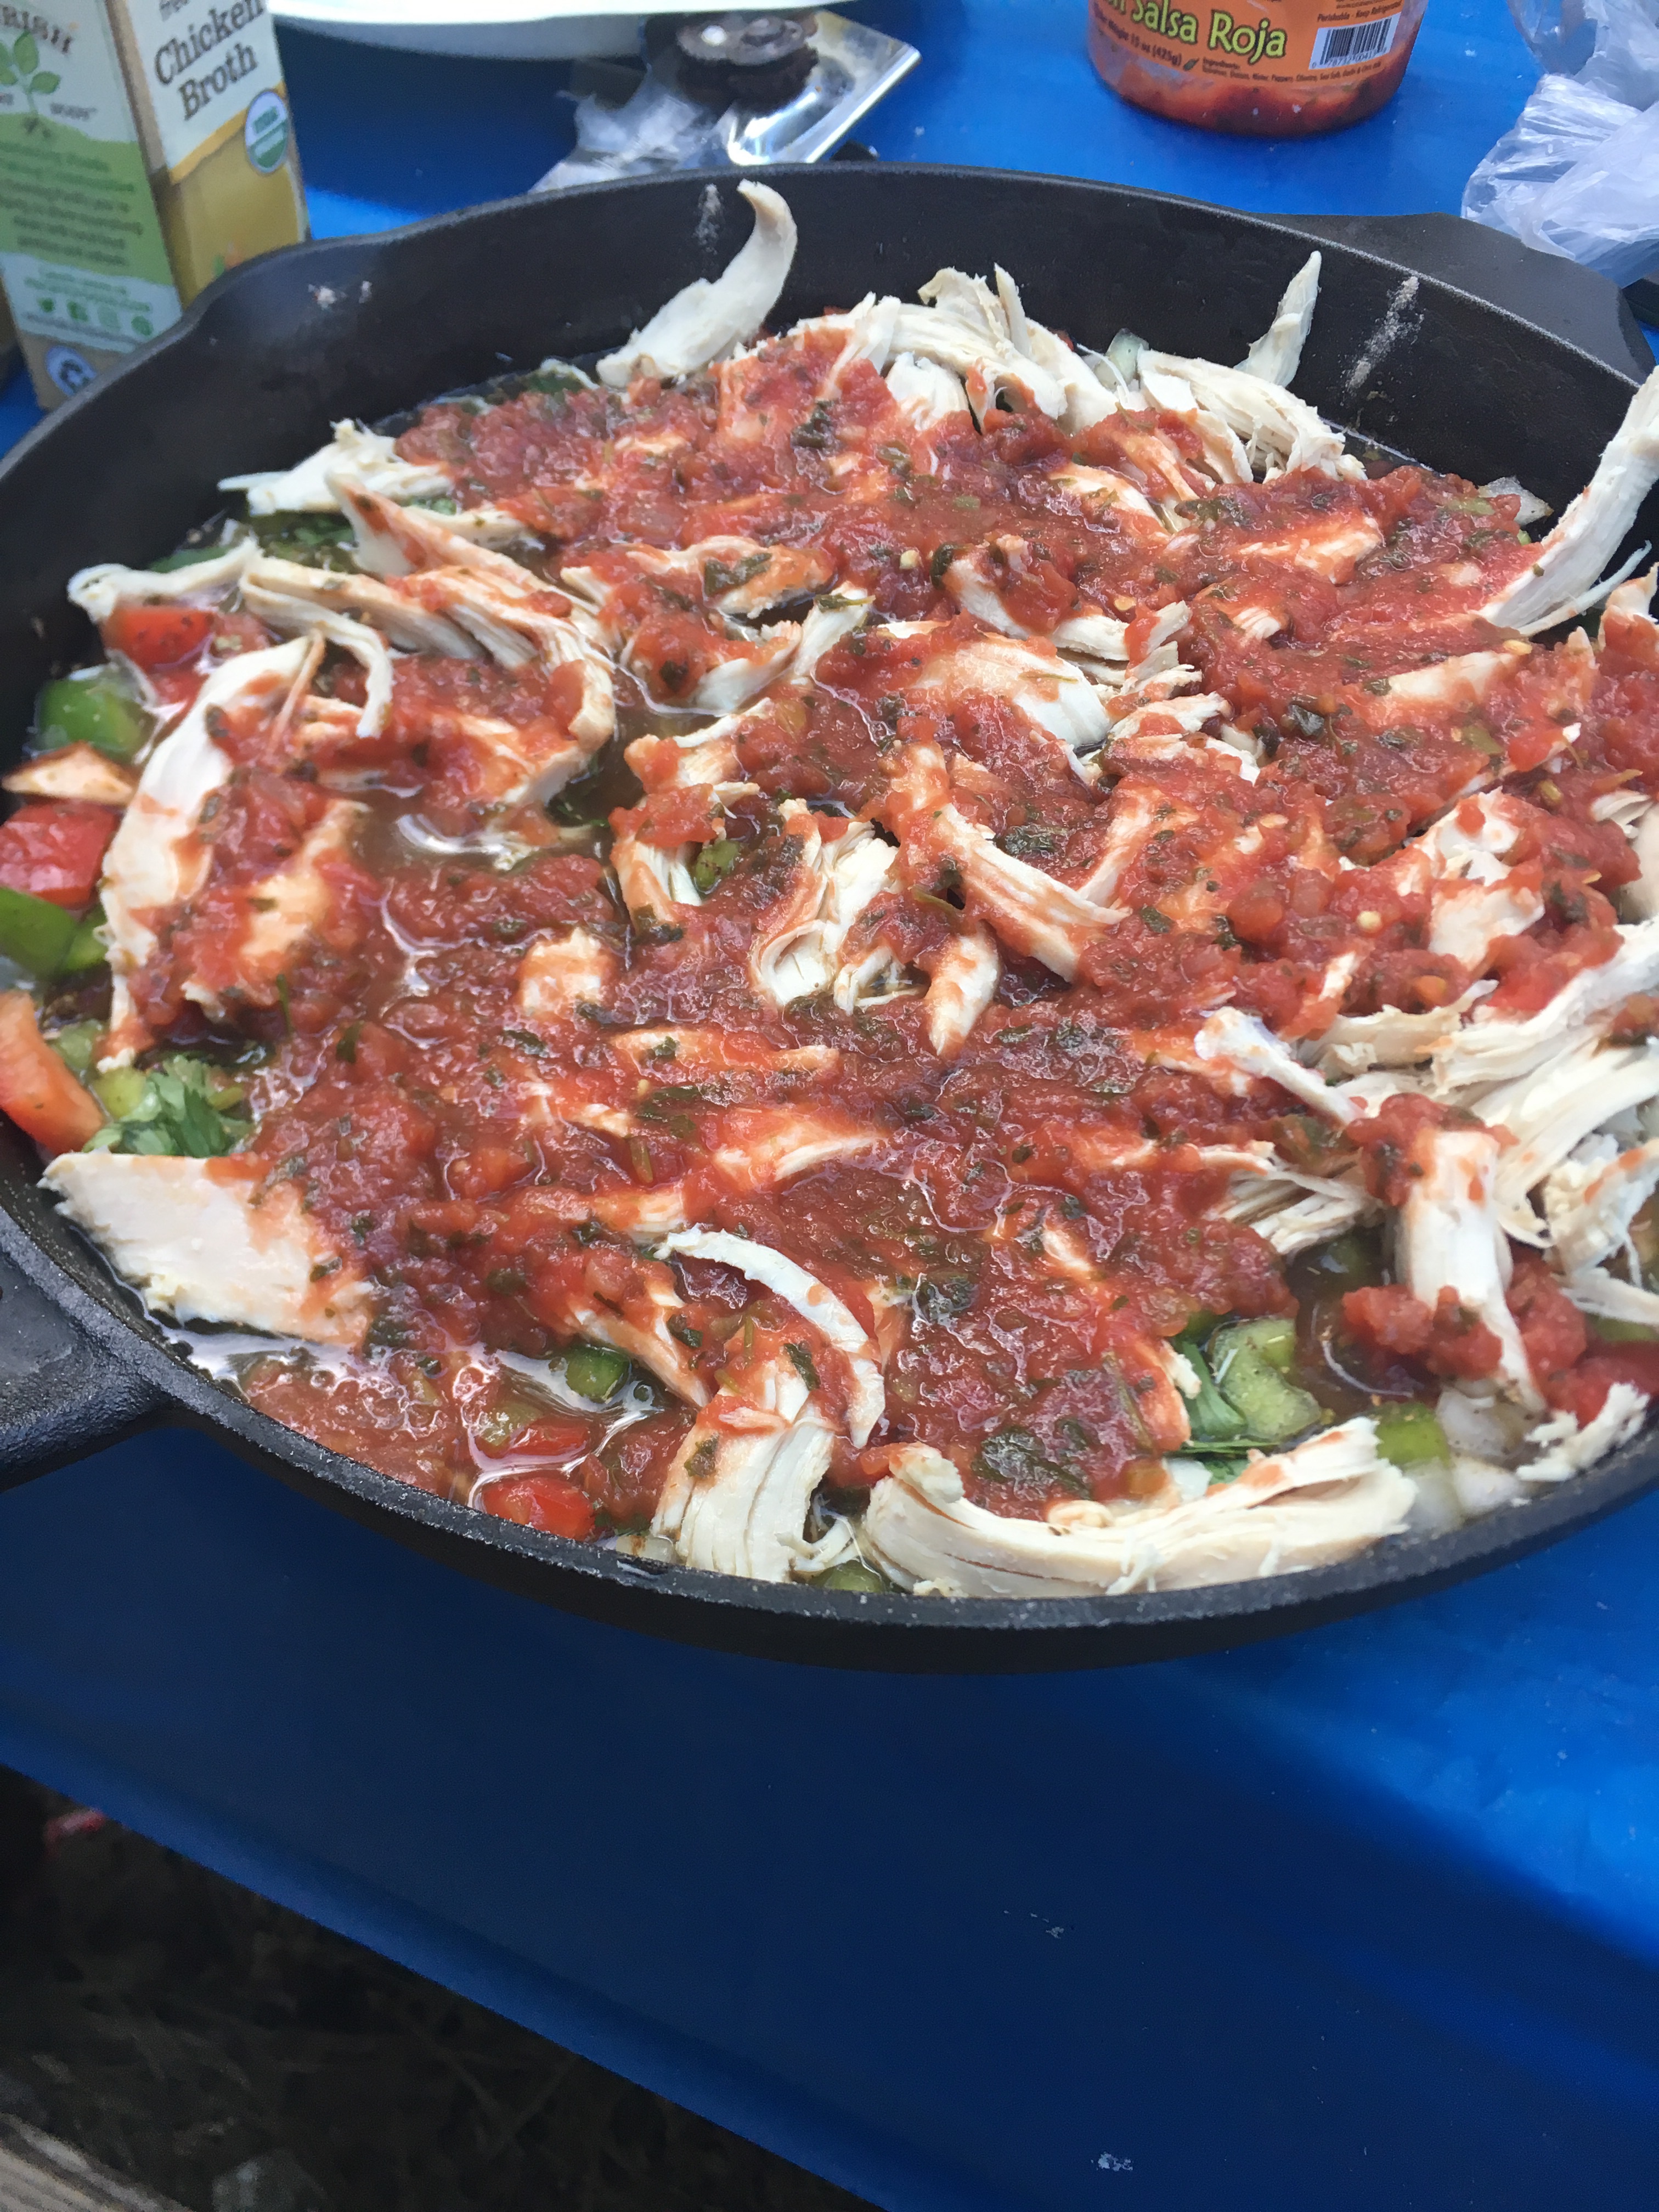
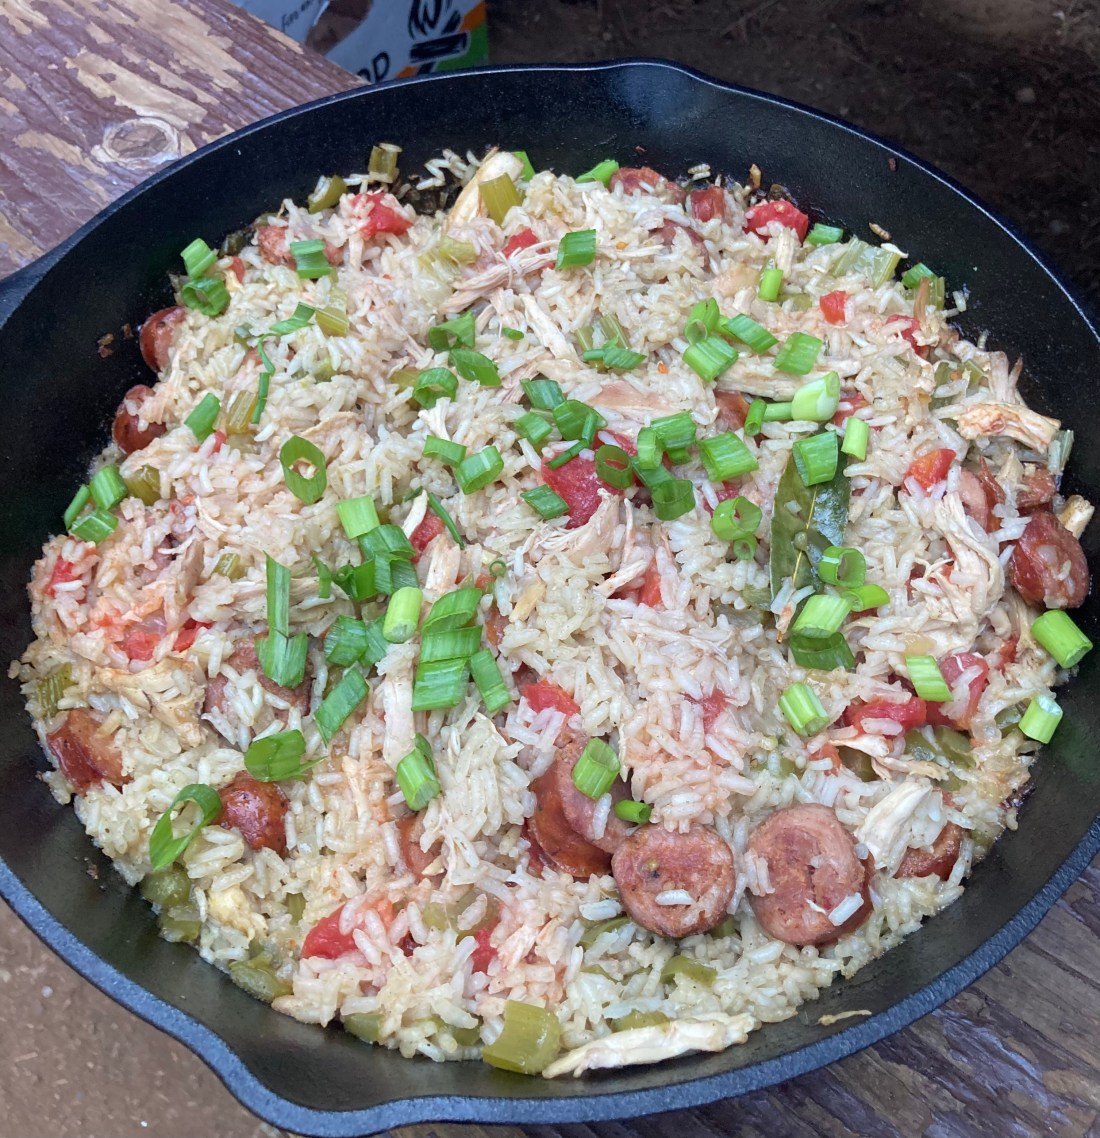
When I was in my 20’s, I visited New Orleans for the first time and fell in love instantly. That first trip my friend and I visited the New Orleans School of Cooking. We learned how to make jambalaya, gumbo, bread pudding and pralines. I highly recommend adding to your next trip to The Big Easy. On a recent camping trip, I decided to try making jambalaya over the campfire. I was happy it turned out great! Jambalaya is a comfort dish. It can feed a group and is perfect for a slightly chilly camping evening. The most common proteins in jambalaya are chicken, sausage, and shrimp but my recipe omits shrimp. Also don’t forget the “holy trinity” of Cajun cooking – onion, celery and bell pepper. I cooked this in my reliable cast iron pan and I paired this dinner with my campfire cornbread.

Ingredients –

  • 1/4 c. oil
  • 2 cups cooked chicken, shredded (I roasted a chicken for this before the trip. Just shred and add to a Ziploc bag to put in cooler)
  • 4 andouille sausages
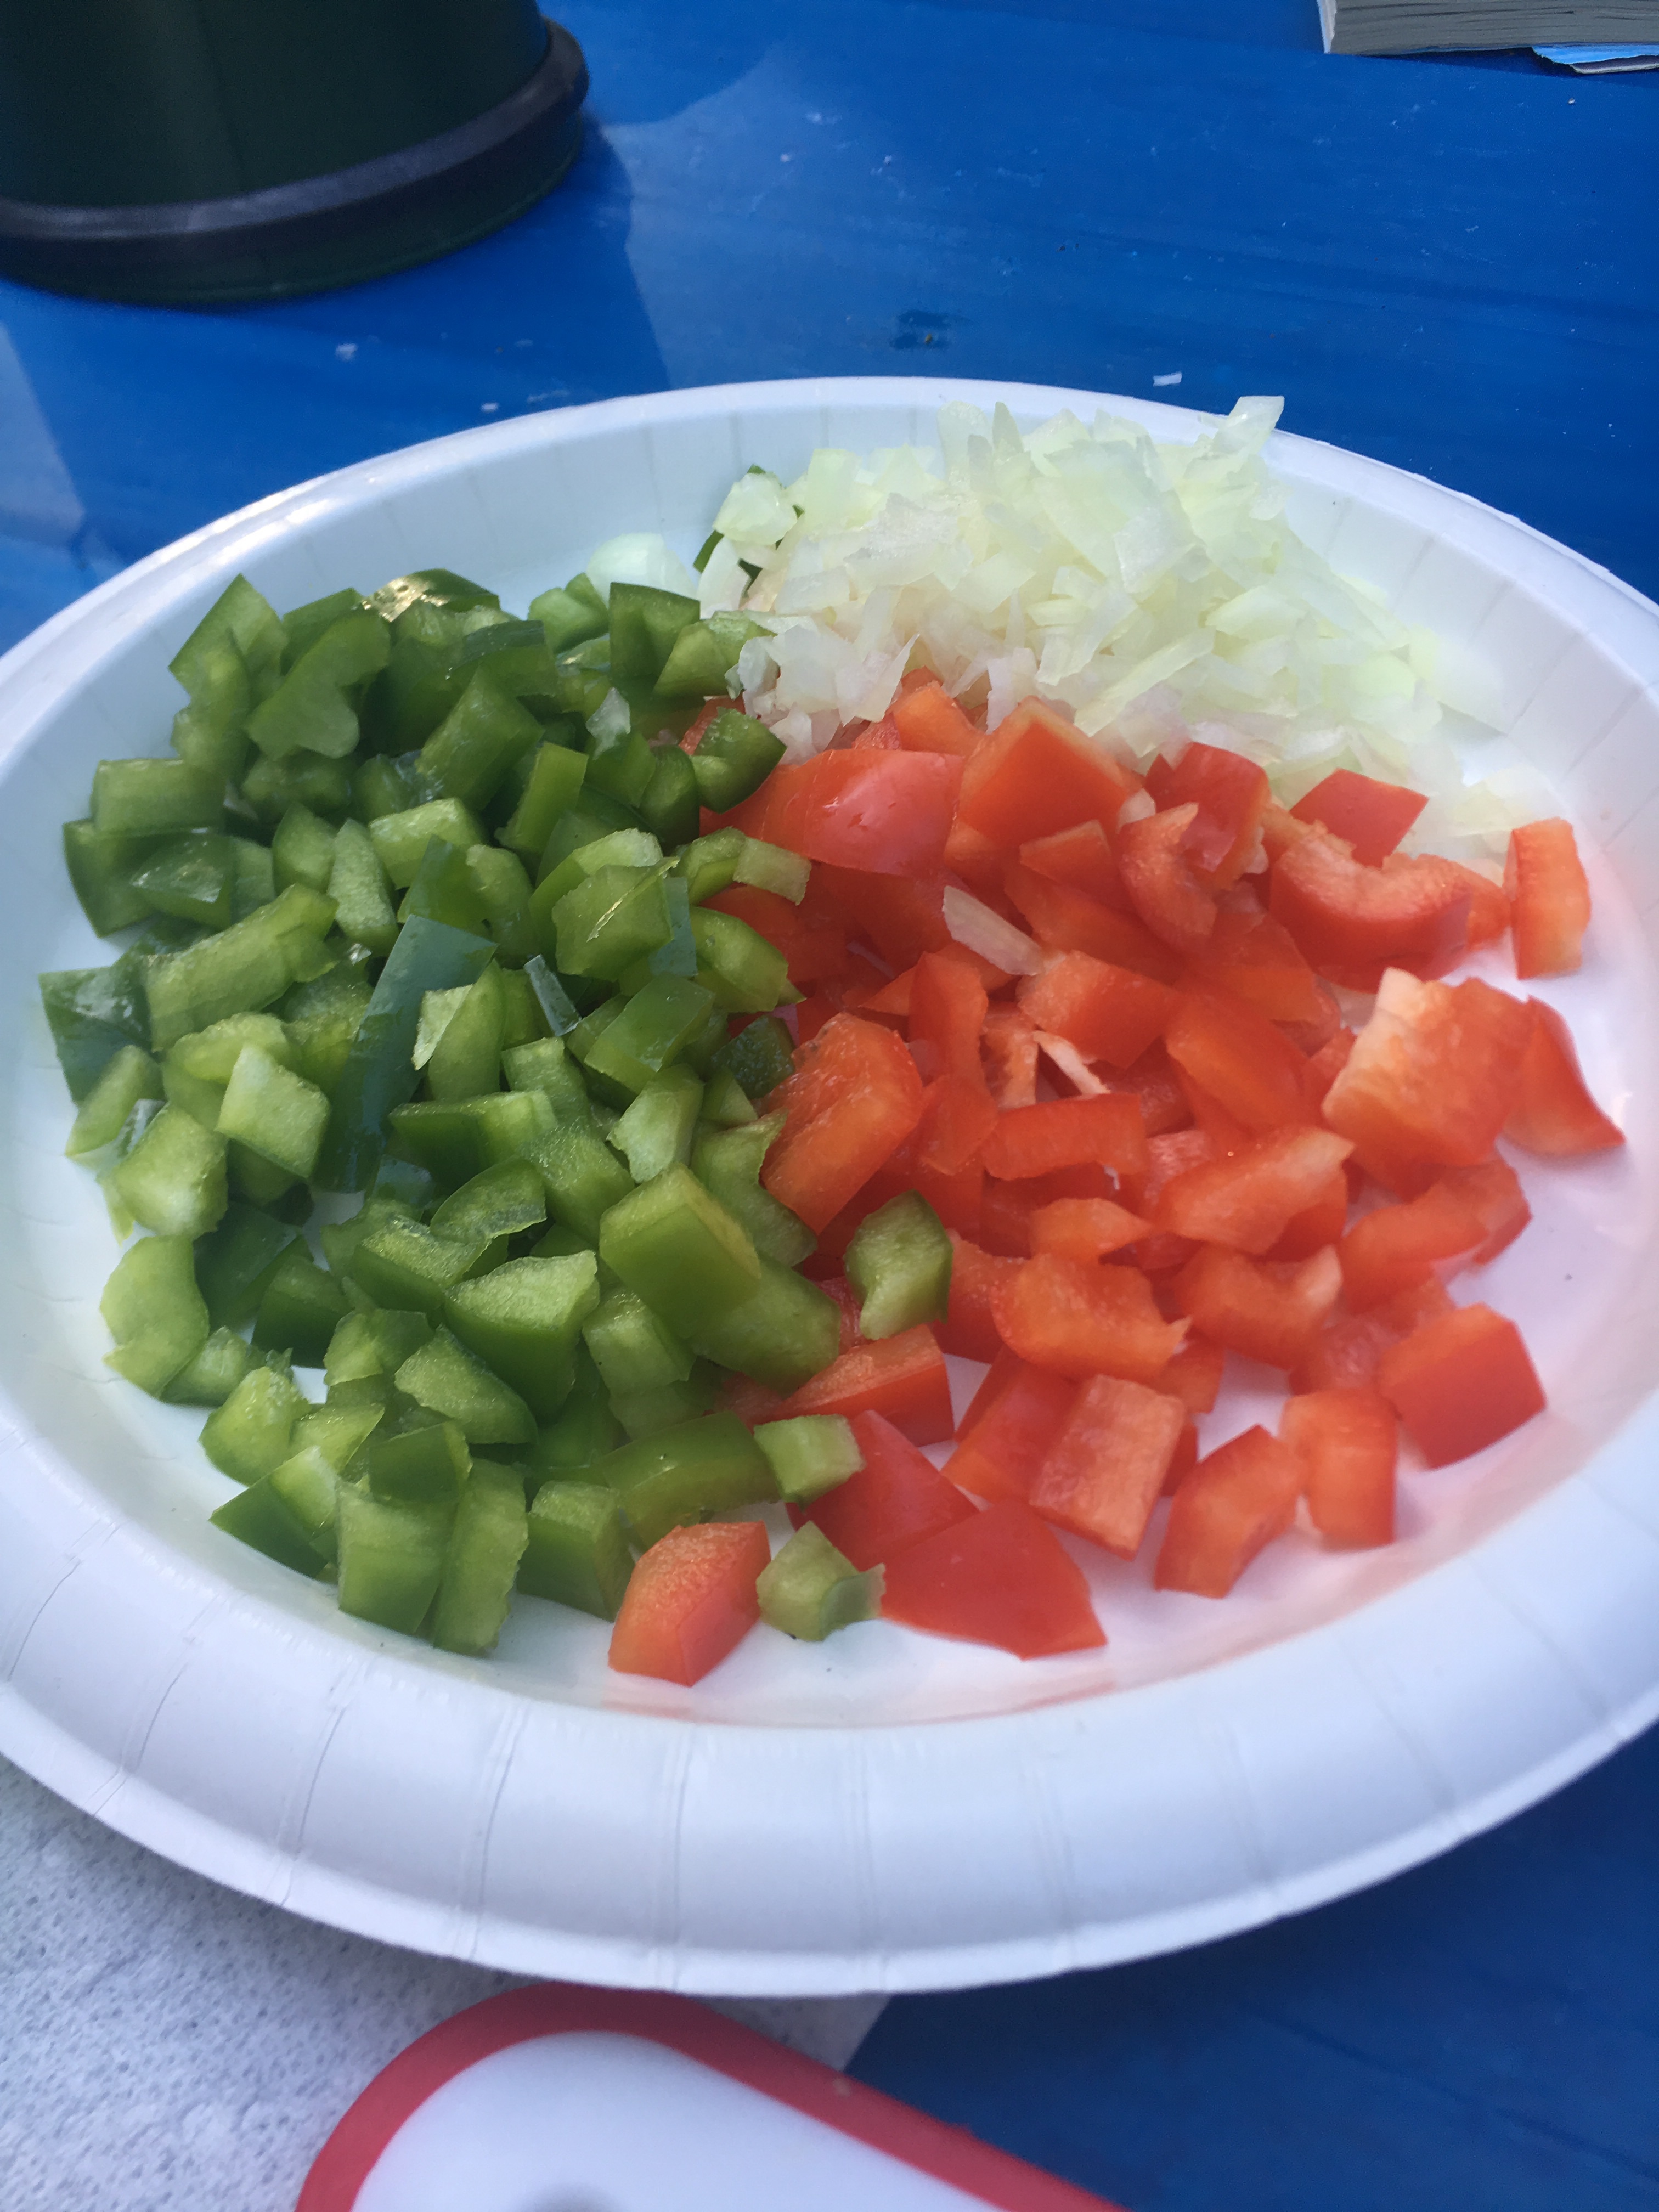
  • 1 c. chopped onion
  • 1/2 c. chopped celery
  • 1/2 c. chopped green bell pepper
  • 1 tbsp. chopped garlic
  • 1 cup long grain rice
  • 2 cups of chicken stock or broth (I would bring extra like 32 oz carton)
  • 3 large tsp. Joe’s Stuff seasoning (or voodoo seasoning)
  • 1/4 c. paprika (smoked or sweet. I used smoked)
  • 2-3 chopped green onions (optional)
  • 1 14.5 oz canned chopped tomatoes
Sausage & Chicken with onion, bell pepper and celery (holy trinity) sautéing

Directions –

  1. Cook sausage in pan with a bit of oil. Once fully cooked, remove and slice. Set aside for now
  2. Add oil to cast iron and let it heat up
  3. Once hot, add chopped onions, celery and bell pepper to pan
  4. Stir the holy trinity until the tenderness you want
  5. Add sausage and shredded precooked chicken to pan
  6. Pour broth into pan and season with Joe’s Stuff (or Voodoo) and paprika
  7. Bring to a boil
  8. Add rice and bring to a boil again
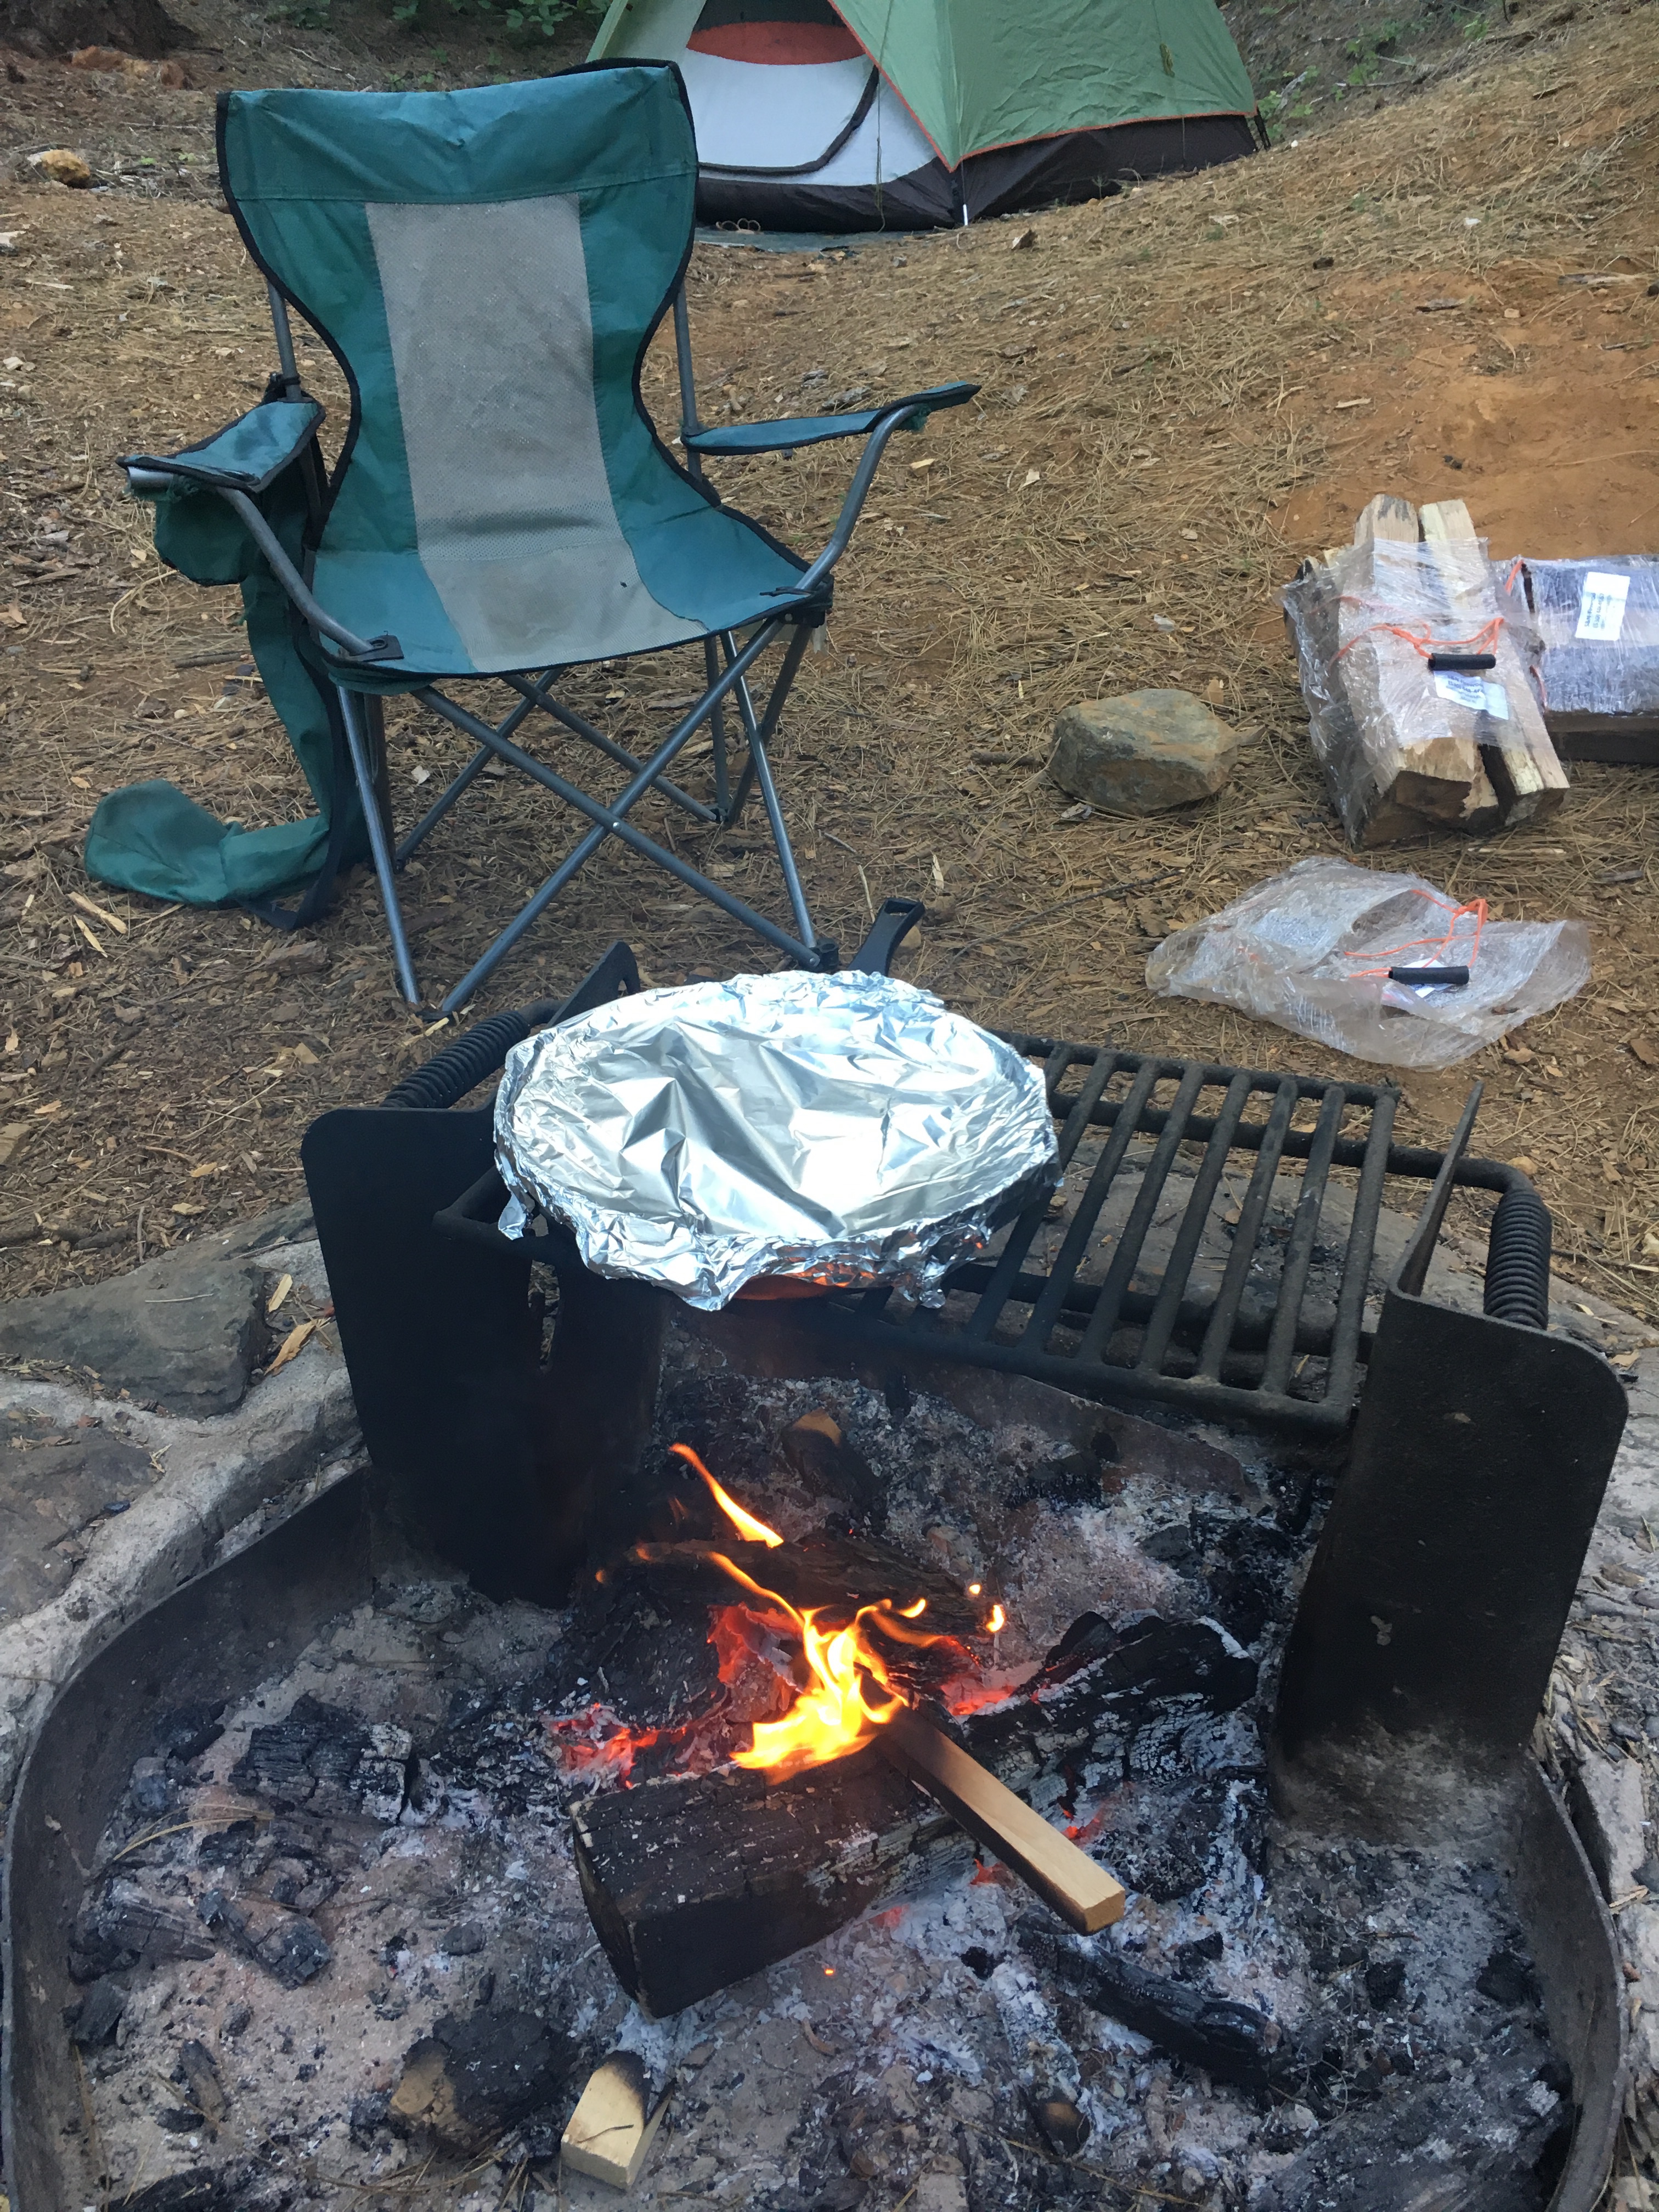
  9. Cover with foil and move pan to indirect heat
  10. Cook until rice is done. This will depend on how hot your fire is but should take about 30-45 minutes
  11. Check while cooking periodically and add more broth as needed to cook rice
  12. Cook covered for 25 minutes and then remove foil and continue to cook until rice is done, stirring periodically to make sure rice doesn’t stick
  13. When done, top with green onions and chopped tomatoes, if desired

Rating: 5 out of 5.

Easy Camping Pancakes Recipe for Shrove Tuesday

Happy Mardi Gras/Shrove Tuesday/Pancake Tuesday! When I was growing up, the church I went to would serve pancakes on the evening before Ash Wednesday (Shrove Tuesday).

Shrove Tuesday is the day before Ash Wednesday, which marks the beginning of Lent in the Christian calendar. It is traditionally a day of feasting and celebration before the fasting period of Lent begins. In many countries, it is known as Pancake Day because of the custom of making and eating pancakes to use up rich ingredients like eggs, milk, and sugar before the Lenten fast. The word “shrove†comes from the old English word shrive, meaning to confess sins and receive absolution. Shrove Tuesday falls 47 days before Easter, so its date changes each year.

When I got to college, I continued the tradition with my college roommates who are still my good friends today. One of my roommates even started the tradition with her daughters.

Anyone who knows me, knows my deep love for the city of New Orleans! So I really don’t need Mardi Gras to get into the spirit of listening to my favorites Galactic, Trombone Shorty or Kermit Ruffins and whipping up some pancakes (or crepes if feeling French!) but will definitely do so on this day.

Another great time for pancakes is when camping because as my friends and I like to say “there are no calories when camping”. Sometimes I will get lazy and just bring some Kodiak mix but a lot of times I will pre-make the pancake dry ingredients and put it all in a gallon zip lock bag. When at the campsite, just add a couple eggs, a couple tablespoons of vegetable and a bit of liquid you have on hand (milk, buttermilk or water).

Note – This recipe makes about 9 pancakes so multiple by how much mix you would like to make. I usually multiple by at least 4 since the dry ingredients will last in the zip lock bag for a good while if you don’t use it all.

Ingredients:

  • 1 cup all-purpose flour
  • 1 tablespoon sugar
  • 3 teaspoons baking powder
  • 1/4 teaspoon salt
Camping Pancakes with Bacon

Directions:

  1. Add 2 cups of dry ingredients into a bowl
  2. Add 2 eggs and about 3 tablespoons of vegetable oil
  3. Stir in liquid (milk, buttermilk or water) to the bowl and mix until well combined (about 1 1/2 cups)
  4. If necessary to get desired consistency, add more liquid by tablespoon until reaching consistency you want
  5. Heat a griddle or cast iron pan and add either butter or spray to pan
  6. Pour 1/4 cup of batter onto the griddle or pan
  7. Cook until bubbly on top, puffed and slightly brown around the edges and then flip and cook other side until golden brown
  8. Top pancakes with butter, fruit, maple syrup or whatever your heart desires!

Laissez les bons temps rouler! It’s Mardi Gras Day!

Pancakes with sugared strawberries and whipped cream

I would love feedback! If you have tried this recipe, please rate below and/or comment!

Celebrate New Year with Black-Eyed Peas: A Delicious Recipe

It is almost the holidays and my family has a few traditions for Christmas and especially New Years. Usually though we have forgotten to pick up black eyed peas until that time period after Christmas and before New Years so I’ve learned to keep the dried beans on hand year round now!

In some cultures, eating black-eyed peas on New Year’s Day is considered a tradition that brings good luck and prosperity for the coming year. This practice is particularly common in the Southern United States. The peas are thought to symbolize coins or wealth, and the tradition has been passed down through generations as a superstition associated with ensuring a prosperous start to the new year.

Black-eyed peas are a nutritious food with several health benefits. They are a good source of protein, fiber, and various vitamins and minerals. Some potential benefits include:

1. **Rich in Protein:** Black-eyed peas are a plant-based source of protein, which is essential for muscle repair and overall body function.

2. **High in Fiber:** The fiber content in black-eyed peas promotes digestive health and can help regulate blood sugar levels.

3. **Vitamins and Minerals:** They contain vitamins such as folate and vitamin A, as well as minerals like potassium and iron, contributing to overall health.

4. **Heart Health:** The fiber, potassium, and folate in black-eyed peas may support heart health by helping to manage blood pressure and reduce the risk of cardiovascular issues.

5. **Weight Management:** The combination of protein and fiber can contribute to a feeling of fullness, potentially aiding in weight management.

In addition to their nutritional value, black-eyed peas are versatile and can be used in various recipes, making them a healthy addition to a well-balanced diet.

Over the years, I’ve tried a few different versions of black eyed peas until one New Years a couple years back, I asked to take over duties and made this recipe that has now solidified me making it for my family every January 1!

This past summer, since I like the recipe so much, I thought to try out on my friends while camping. I usually make some kind of soup the last night and thought this could be the option. I am happy to report it was a hit with my friends in the wilderness just as much as my family warming up to it on a cold New Year’s Day around a bayberry candle watching the Rose Parade!

Ingredients

  • 2 cups black-eyed peas, dry (or 2 cans not dry)
  • 8 oz. Bacon chopped (or more) – I love to go to Kinder’s or Diablo Foods for this!
  • 1 cup white onion, diced
  • 2 tsp. Garlic, minced
  • 4 c. Chicken broth
  • 1 – 2 Bay leaves
  • 1/4 tsp. Red pepper flakes
  • Smoked salt – I use Cherrywood Smoked Salt from Oaktown Spice Shop – best ever!
  • Pepper
New Year’s Black-Eyed Peas

1) If using dry peas, soak 6 hours or overnight. For camping, I brought a Tupperware and soaked them in that overnight.

2) In cast iron skillet, cook bacon until crispy. Drain on paper towels and chop. Set aside

3) Add onions to cast iron with bacon and cook until translucent

4) Add garlic with onions, cook until fragrant

5) In a large pot, add peas, onions, garlic and chicken broth, bay leaf, red pepper, and smoked salt and pepper to taste

6) Bring to a boil

7) Move to indirect heat if camping over fire, or low heat if at home, and simmer 20-30 minutes

8) Garnish with bacon, more salt (if desired), and a few dashes of Tabasco (if desired)

9) Enjoy and cheers to the new year!

The Goose Hangs High!

I would love feedback! If you have tried this recipe, please rate below and/or comment!

Easy Campfire Muffins Recipe to Try

Once I found this cute cast iron muffin tin, like this one, I knew I was going to have to test out some muffins for breakfast. I’ve mentioned this before but I used to make my own pancake/baking mix before a camping trip until I learned about Kodiak Pancake Mix which can be used for many different baking items, I haven’t looked back. It is easy to use, delicious and packed with protein! I highly recommend if you haven’t checked them out before.

Ingredients –

  • 2 cups Kodiak Pancake Mix
  • 2 Bananas
  • 2 eggs (I pour from my egg water bottles that I prep before the trip and gauge 2 eggs)
  • 1/2 cup cinnamon sugar mix (1 part sugar to 3 parts sugar like I use for monkey bread recipe)
  • 1 to 1.5 cup water
  • Brown sugar
  • Oil or cooking spray
  • Foil
Continue reading “Easy Campfire Muffins Recipe to Try”

Chile Verde Chicken & Rice

I will not lie – I am always terrified of not cooking some meats well enough and making my fellow campers sick! So I usually stick to meats that it is ok if I under cook (I.e. beef)

But a few years ago (before pandemic), I took my mom and sister to a cooking class for fun at Sur La Table (R.I.P. Walnut Creek Sur La Table). The chef that day told us about his favorite tool – the ThermaPen! Learning about this product gave me the guts to finally try out cooking raw chicken while camping. No one wants to eat it raw and it can easily be dried out by overcooking. But never fear with the ThermaPen! It can literally get the temp down to the .01!

The Marinade

  • 1 1/2 lbs of tomatillos
  • 5 garlic cloves
  • 2 jalapeños (I omitted for the trip because one camper could not handle heat. Adjust to the temp level of your fellow campers!)
  • 2 Anaheim or Poblano peppers
  • 1 bunch of cilantro, roughly chopped
  • Black Pepper
  1. Add all ingredients into a blender or food processor. Blend til smooth
  2. Pour marinade over sliced boneless skinless chicken breasts (1/4 – 1/2 lb per person) in a ziplock bag
  3. Freeze in freezer until camping trip
Chile Verde Marinade Ingredients
Camping Chile Verde Chicken and Rice
Grilled Chicken using Thermapen!

Chile Verde Chicken & Rice

  • 4 tbsp olive or vegetable oil
  • Bag of mix seasoning of garlic powder, paprika, oregano, cumin, salt & pepper
  • Onion, yellow or white, chopped
  • 4 cloves garlic, minced
  • 1 cup rice
  • 32 Oz chicken broth
  • 1 can corn
  • 1 can black beans, optional
  • Queso Fresca cheese
  • Avocado, optional
  1. Thaw chicken (if frozen)
  2. Add a bit of oil to cast iron pan and add sliced marinated chicken once heated
  3. Heat on one side for about 5 minutes and flip
  4. Heat another 5 minute and then use Thermapen to test see temperature. If at 165 degrees continue. If you don’t have the Thermapen, to be safe, heat chicken on both sides 8-10 minutes each
  5. Remove cooked chicken
  6. Heat cast iron again with 2 tbsp oil and add chopped onions. Stir a few minutes and then add garlic. Stir for a couple more minutes
  7. Add rice and stir for 1 minute, slightly browning
  8. Add chicken broth, cooked chicken, beans, corn, and extra verde (if have)
  9. Bring to a simmer, top with aluminum foil
  10. Cook for 30 minutes
  11. Uncover and add queso cheese. Recover with foil and cook for another 15 minutes or until rice is cooked
  12. Topped with avocado (if wanted!) and more cheese (do not deny yourself!)

I would love feedback! If you have tried this recipe, please rate below and/or comment!

Rating: 5 out of 5.

Easy Cast Iron Veggie Frittata for Camping

If you ever wanted to know how real my blog is (and that I’m not working to get influencers or likes), you can tell from my photos.

I have a good group of friends who go camping with me and encouraged me to make this blog because they LOVE my food and they thought others would like as well. In fact they recruit others who never go camping (including this summer) on the sole basis of my food

My motto is I don’t do the basics – hot dogs, hamburgers. Nothing against any of those things, I just love to push myself. And not all our winners, but when something is, I want to share this here!

I say this because my friends will be the first to tell you – I am so busy prepping, cooking and serving the meal, that a lot of times, I don’t turn on my phone to take a picture (I ALWAYS camp where there is NO signal so my phone is never on!). In fact a big group trip we had this summer, I had to have people remind me and we were all living in the moment, that out of 8 people, only one remember on one occasion!

I preface all of this because this meal is one of them. I saw the grill we had when we got there and realized it was not big enough to cook reasonably for 8 people completely in two cast iron pans. So I did a quick maneuver to make the frittata and it was so good, half of it was served up before I could take a picture (hence the first picture!)

The fun thing about this dish is you can play around. I made it again the next day with a couple different ingredients. We had half the group loving tomatoes which I say is a must for this, but another half hating them, which is why half the frittata has tomatoes. You can strategically place based on likes!

Morally of the story, I hope you come here to find new recipes, try them and love them and share! And if anything, just know I’m 100% authentic!! Cuz I promise I am and just want you all to enjoy – bad pictures or not 😂

Breakfast Veggie Frittata

Ingredients

  • 2 tbsp vegetable or olive oil
  • 1 yellow or white onion, diced
  • 1 – 2 tomatoes, diced
  • 2 tbsp minced garlic
  • 1 cup spinach
  • 8 – 12 eggs (depending size of group), whisked
  • Sliced mozzarella and/or Mexican cheese
  • Any leftover meat or deli meat you want to use up (optional)
  • Any other veggies you want to use up (optional)
  1. Slice all veggies and mince garlic
  2. In one cast iron pan, pour oil into it and heat
  3. Add onions and garlic and sauté until tender
  4. Whisk eggs in a bowl with veggies and cheese
  5. For easy cleanup, line another cast iron with aluminum foil (if only one pan, skip this step)
  6. Pour mixture into pan
  7. If omitting any veggies for the group, do not add them in the bowl in step four and carefully place them on top of the eggs in the pan here on one side to separate from total
  8. Cover pan with foil
  9. Place over indirect heat on the campfire
  10. Cook for about 35-45 minutes until the eggs have set in the pan (don’t jiggle in the middle when you move the pan)
  11. Top with hot sauce, if desired
  12. In the first picture, instead of shredded cheese, I topped with American cheese. Also good but recommend shredded!

I would love feedback! If you have tried this recipe, please rate below and/or comment!

Rating: 5 out of 5.

Easy Keto Cheese Steak Casserole for Camping

I was starting to wonder if I was going to get to camp this summer but thankfully I was able to find a spot for a couple of nights. So a girlfriend and I packed up the car and headed for some nature, float time and hikes! I wanted to make something easy the first night and my friend is keto so spent time searching my brain for ideas until I realized I could just re-create my cheese steak recipe for the grill as a casserole! It turned out so good we nearly at the entire pan between the two of us!

Keto Cheese Steak Casserole

Ingredients –

  • Sliced deli roast beef
  • Red bell pepper
  • Orange bell pepper
  • Yellow or white onion
  • Italian dressing (I used Ken’s Simply Vinaigrette Italian to avoid any added sugar and carbs)
  • Sliced provolone cheese
  • Sliced pepper jack cheese
  • Butter lettuce (optional)
Peppers and Onion Sauteing over Campfire

Directions –

1) Place cast iron over fire and add tablespoon of oil until heated

2) Add sliced bell peppers and onion to cast iron. Saute until semi-soft

3) Add 1/4 – 1/2 cup Italian dressing until peppers and onion are coated

4) Place sliced roast beef evenly around cast iron

5) Top with provolone and pepper jack cheese until fully covered

6) Cover cast iron with aluminum foil and heat for about 15 minutes or until the cheese has fully melted and roast beef is heated through

7) Serve with butter lettuce (as a lettuce wrap) or side salad

Sugar Pine Reservoir

I would love feedback! If you have tried this recipe, please rate below and/or comment!

Rating: 5 out of 5.

Campfire Southwestern Chicken Rice

I always love making Mexican dishes while camping because I always have the ingredients on hand and it’s always a crowd pleaser. On a camping trip this summer, I decided to branch out a little and try to make rice. I was nervous how this would do in my cast iron pan but then I saw these mini chicken broth containers at the store and knew I needed to try. They are small so they don’t take up much space which is great when camping but also you don’t have to feel like you are wasting a lot with a big container or not using a whole can. For the broth I used almost two small ones but I would definitely just gauge with the dry ingredients (veggies, chicken, rice) vs. liquid ratio. Also, for this recipe I used chicken that I cooked at home before the trip. Before any camping trip, I roast a small chicken in my oven for about 2 1/2 hours and then let it cool. Once cooled, I shredded the chicken and store in a ziploc bag. Once at the campsite, you have cooked chicken you can add to a lot of your meals if you would like.

Ingredients-

  • 1 cup rice
  • 1 cup salsa
  • 2 cups chicken (pre-cooked) – I roast a chicken before the trip and shred pieces into a ziplock so you can add to anything
  • 1 can black beans (or pinto)
  • Red bell pepper
  • Green bell pepper
  • 1/2 yellow onion
  • Fajita spice mix
  • 1 3/4 cup chicken broth
  • Mexican shredded cheese
  • Cilantro (optional)

Directions –

  1. Chop bell peppers and onion
  2. Add all ingredients to a cast iron pan
  3. Cover with foil
  4. Heat to a boil (check periodically by lifting a small corner of the foil)
  5. Once boiling, let simmer for 15 minutes
  6. Remove cover and add cheese and then re-cover
  7. Heat another 5 minutes until cheese is melted
  8. Remove and fluff
  9. Top with cilantro if desired or have extra at campsite to use

I would love feedback! If you have tried this recipe, please rate below and/or comment!

Rating: 5 out of 5.

Delicious Campfire Breakfast Sandwich Recipe

Last Christmas one of my sisters and her husband got me a new camping tool.  So last December, I started looking up ideas on what to use it for and breakfast sandwiches were my first thought.  Even though we believe there are no calories during camping, I still went with a healthier turkey breakfast sausage vs. other meats but you can use whatever type of breakfast meat patties you are craving.  If you would like to do turkey breakfast sausages, please check out my previous recipe post here – Homemade Turkey Breakfast Sausages

Ingredients

  • Breakfast sausage patties
  • Eggs
  • English muffins
  • Sliced American cheese
  • Cast iron cooking iron like this one

Directions

  1. Scramble eggs in a pan either on campfire or propane grill if you have one
  2. Warm (or cook if you didn’t make ahead) the breakfast sausages
  3. Assemble sandwiches by layering a sliced English muffin on the bottom of the cast iron, top with a meat patty, some scrambled eggs, a slice American cheese and top with the top of the English muffin
  4. Close cast iron cooking iron and hold over the campfire for about 5 – 8 minutes until the cheese has melted and the English muffin is toasted
  5. Remove and add hot sauce (if you are into that type of thing) and enjoy!

I would love feedback! If you have tried this recipe, please rate below and/or comment!

Rating: 5 out of 5.

Make-Ahead Breakfast Sausage for Camping

So while you can definitely make these simply at your campsite with the ingredients and a bowl, I like to make ahead to save time in the morning. You can also freeze these after making which helps keep the cooler cold

I am also lucky to have Oaktown Spice Shop locally and highly recommend their spice blends especially this breakfast sausage one. Yes, you can make your own spice blend but theirs is so tasty, I haven’t made one in years!

Ingredients

  • 1 lb. ground turkey
  • Salt
  • Oaktown Spice Shop Breakfast Sausage blend
  • Maple syrup (optional)

Directions

  1. Knead 2 tsp. salt into 1 lb. ground turkey for a few minutes in a large bowl
  2. Add 2 tbsp. of breakfast sausage spice and mix together with hands
  3. Add 1-2 tsp. maple syrup depending on how sweet you like making sure patties remain sticky
  4. Form into small patties
  5. Heat oil in a fry pan
  6. Add patties to pan and cook for about 5 minutes
  7. Flip and cook for another 5 minutes or until the center is 165 degrees
  8. Add to freezer bags if storing in freezer or can keep in refrigerator for 3-4 days

I would love feedback! If you have tried this recipe, please rate below and/or comment!